The new challenge over at Addicted to CAS is: monster. I used a Create a Smile set called Big time, stamped the little monster with My Favorite Things Hybrid black ink onto Schut watercolorpaper.
Watercolored him with Distress inks (dusty concord, mowed lawn and hickory smoke) Mounted the panel with foamtape and adhered it to the cardpanel onto wich I stamped the sentiment, form the same set. For more information on the Addicted to CAS challenge, see this
I made this card for the Work it Wednesdays over at Simon Says Stamp, showcasing their own brand. I started by die cutting the YOU from a card panel and then stamped the sentiment from Friendship blooms. I used Versafine onyx black ink and I did a partial print to suit my card. The shaker compartment is made with craftfoam and you can see how I did it in the video.
I filled it with coloursful star confetti and to make the YOU pop I used red cardstock behind the shakercard. For more information on the Work it Wednesday Challenge, see this ( I can't find the direct link)
Pa rum pa pum pum... and stamped them with MY Favorite Things black hybrid ink onto Neenah solar white panel. and on some Inkadinkado masking paper. Cut out the masks and placed them on top, then used Post-it tape to make a banner I sponged with Distres sinks tumbled glass and stormy sky. Peeled off the masks and colored the toy with Spectrum Noir markers. Mounted the panel with my ATG onto a cardbase. and I'd liek to say goodbye to Jennifer from SSS, good luck with your new ventures.
The Challenge
for Monday at the Simon Says Stamp blog is : autumn.
So I used the Create a smile stampset (time
to give thanks) and stamped the various leaves with Versamark and heat embossed
them in gold.
I did this
on a watercolour paper panel and used various Distress inks to watercolour the
leaves in autumnal colors. (aged mahogany, fired brick, vintage photo, rusty
hinge, candied apple, fossilized amber, wild honey, spiced marmalade.
The
sentiment is from the same set and I used the same gold embossing powder
(Papermania gold) on black cardstock.
I mounted
the watercolour panel onto the cardbase with the ATG gun and then mounted the
black strip with foamtape, cut off the excess.
For more
information on the Simon Says Stamp Monday Challenge, see this
I used the colours from the CAS Colours and Sketches Challenge and the recipe from the Less is More Challenge: acetate or vellum. I started by die cutting the stag from 140lbs cardstock and then I stamped the sentiment from Cuddly Buddly with Versafine and heat set it. I then cut acetate and a piece of craftfoam and patterned paper to fit the shaker card panel. The patterned paper has some green and red Christmas decoration on it so I thought it would fit. For the red and green I used star sequins/confetti and seedbeads to fill the shaker card. for the metallic copper I splatter Distress spray stain antique bronze over the front, for some nice shimmer.
For more information on the CAS Colours & Sketches Challenge, see this For more information on the Less is More Challenge, see this
The Wednesday CHallenge over at Simon Says Stamp is: think pink. Showcasing Pink and Main products, which I have none of. I have stitched rounded rectangles die from another brand, could have used those, but I'm not sure it would go through this 140lbs watercolor paper. I used the Hero Arts Deer 4x6 stampset I was given by SSS for being spotlighted a while back. I stamped it repeatedly in Versafine ink with the MISTI as I wanted a deep black print. The to color the panel I used the re-inker for Distress ink picked raspberry.and applied is a sort of ombre effect, not sure if the camera picks it up well. Mounted the watercolor panel with foamt tape to the cardbase and added little gold star confetti with glue dots. Opted to add a sentiment, but it's already in the stamp and I like how it is the focus point. For more information on the Simon Says Stamp Wednesday Challenge, see this
Simon Says Stamp Monday Challenge is all about gift bax and boxes. Now earlier this week I saw a video from My Favorite Things where she made this type of lip balm holder booklet thing. She attached the lipbalm with washi tape. I didn't like that and instantly thought of a better way to do it if you don't like the washit tape either, otherwise her design is superb and a great idea. I started with the Christmas one and some old patterned paper I had as I I wanted to
cover up the spine of the "book", you can see the lipbalm peeking out on the Halloween one. In hindsight that wasn't the best idea as you only have limited space to add glue and so it looks like it's loose and it's not. I started with white cardstock as I had the Distress inkblending in mind, so after I finished the Christmas one I did a candy corn like inkblending with ripe persimmons, wild honey and mustard seed. I then went over the bottom two colors again with ripe persimmon as I didn't like the wild honey after all...I feel I'm being extra critical today ;-) Anyway to make it you use a piece of paper sized: 6"x 3,5inches you score on the long side at 2"3/8, 3"and 3"5/8. Reinforce the score lines, then fold in half, Make two cuts in the middle from one score line to the other , and a smaller cut on the top and bottom, say half the size, It's not
really important, just smaller. Fold the cut bits inwards, start in the middle, insert lipbalm or candy and then secure with the outer slits.
I punched small holes so I could tie the booklet with bakwers twine red and white and orange and white. Added a little silver jingle bell on the christmas one. I did the stamping before scoring on my Halloween one as it was a big foam stamp I
was given last year. if you use smaller stamps and or patterned paper, then you can do it when you like. For more information on the Simon Says Stamp Monday Challenge, see this
The
Wednesday Challenge for the Simon Says Stamp is about resist techniques with
Impression Obsession.
I chose
the emboss resist technique.
First I
thought I could do a happy birthday background, but the stamps is so big, it
wouldn’t make sense through the window.
I showed
in the last video how I did this intricate double partial die cutting and since
I had this panel left over I thought I’d better use it.
So this
panel is made with Neenah Solar white and
stamped with Memento tuxedo black ink.
The
sentiment is from Impression Obsession (c9935)
And I
stamped with Versafine onyx black ink and the Misti as it’s a rubber cling
stamp and I find it hard to line up straight.
I test
stamped it on the Simon Says Stamp grid
paper, and after I adjusted it slightly I stamped it on the card panel and then
heat set it as it’s Versafine.
I colored the dragon with my Spectrum Noir
markers. I wish I had more purples as I really wanted a purple dragon (my
favourite color) and I also looked at my Copic collection and a twinmarker.
Wink of Stella clear glitter pen on it’s
wings.
For the
background I traced the opening onto the card base and masked the edges so
nothing would peek out from behind the card panel that is slightly smaller
(1cm)
I used
Versamark ink to Stamp the Hero arts (tiny stars). I wanted a patchy stamp, so
not perfectly covered night sky, I kind of regret that now there’s a patch on
the lower bit of the window ;-), ah well...
I then
sprinkled on Wow! Clear hologram sparkle embossing glitter and heat set it.
To make
the night sky I used Distress inks(
black soot, chipped sapphire and faded jeans) as per one of my recipes, just
left out the stormy sky, fitting four colors into that little opening seemed a
bit ott.
Mounted
the panel with foam tape and adhered it tot he card base.
That's this week's challenge over at Less is more. I chose a bug ;-) a ladybug or ladybird, depending on where you live. the stamps are clingstamps from Gingersnaps and they're called Bugga- Boo's. I got these second hand, so I don't know how old they are or if they're still available, but they were so cute, I could not resist. I stamped the image onto Schut smooth watercolor paper with My Favorite Things Hybrid black ink and watercolored it with Distress inks. Mounted the panel with foam tape. Stamped the sentiment from Clearly besotted (brushed greetings II) with Versafine black onyx on the cardbase. For more inforamtion on the Less is More challenge, see this
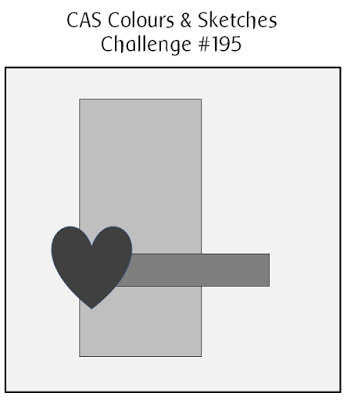
This week it's a sketch challenge over at CAS Colours & Sketches. This is my second card for it, the first...well let's say it looked better in my head than on paper lol. I'm sorry the photo is a bit dark, it's 9p.m. and I tried with the flash, but that didn't turn out great. I salvaged the sponged panel from the first card, I sponged a strip of the cardbase with Dusty concord, shaded lilac and tumbled glass. then stamped the tiny hearts nackground stamp from Hero arts with Versamark and heat emboosed it with Wow! vintage champagne embossing powder. I die cut the scene from white glitter paper I have made sticky with Elizabeth Crafts double sided adhesive. The die is from Leane Creatief (#14).
Stuck the sponged panel onto the cardbase with tape runner, stuck the scenery on top and stamped the sentiment in Versamark also to heat emboss it with Wow! pearl gold sparkle embossing glitter. Much better.... For more information on the CAS Colours & Sketches challenge, see this
I’m
assuming it’s a pun on “are you ready for Christmas?” but i’m not sure...
Aside
from the language barrier getting in the way of jokes, this latest set from My
Favorite Things is soooooooo adorable I just had to get it.
I’m
entering an MFT card challenge for the first time with this card and 2 videos accompany
this adventure.
Mostly
because it would have been a 30 minute video, even sped up.
On my
last video someone commented I need to speak louder. I feel like I am shouting,
but the microphone (which is at my lips) and the audio setting in Movie Maker
do not go up further than what I put out.
So
please turn up your volume instead.
I
started the card with an intricate partial die cut.
If I
could, I would have gotten the dies too, but the set was all I could afford
this month, so I’m showing the process with the Magical dragons as I have the
dies for them.
Instead
the Yeti I cut out with scissors. I did cut off the little strand of lights
dangling from his right arm as that was too complicated and delicate to even
attempt.
Part two
of the video, shows I made the background with Distress ink (Dusty concord,
Shaded lilac and Tumbled glass).
I sued a
Simon Says stamp stencil (falling snow) and Wendi Vecchi embossingpaste. I
sprinkled Wow! Clear hologram sparkle embossing glitter over the wet embossing
paste, and set it aside to dry, whilst I would color my Yeti.
Usually
I do not like cold greys on living animals, this is blue grey, but I think it
goes as the background is also blue tinted, it makes it look grey again.
The blue
face was inspire by a card I saw from Francine Vuillème, she makes great cards.
I tried
a green face, but again, not advisable as it makes the Yeti look like a zombie,
dead again.
I didn’t
shade the light bulbs at all as they’re so small, but I added some sparkle with
a white gel pen, also to his eyes,
Now a
smear of black soot appeared on the front of the panel, I now know how it got
there, but as I wasn’t going to start over I disguised it with a die cut
Christmas tree. I had planned a tree in the window behind the Yeti, just not
there ;-) anyway It looks good.
Mounted
the panel with foam tape onto the card base.
So for those who don;t recognize the sketch in my card, My vision was the lover banner is the horizontal stamped sentiment and the square with the letters in is my circle window. Not sure if all this is allowed , as I say my first time joining in ;-)
For more
information on the My Favorite Things Challenge, see this Part one: the intircate partial die cutting:
The
theme over at the Monday Challenge for Simon Says Stamp is: explore the World.
I
thought this stamp from Penny Black, aptly named Adventures, would go
perfectly.
A little
girl scout or treasure hunter out in the wild, camping in her little tent.
I started by stamping the image with My
Favorite Things, hybrid black ink onto
Schut watercolour paper.
Then I
positioned the Simon Says Stamp falling stars stencil over it.
I mixed Wendy
Vecchi embossing paste with iridescerent glitter to make the stars al nice and
shiny and applied it through the stencil.
Let that
dry.
I then
applies Distress re-inkers as watercolours for the night sky. I had these left
over from my galaxy card. Dabbed the background to get the color off the stars,
let it dry.
For the
girl and tent I used Talens ecoline and I faded the color with grey, as it’s night
the colors are more subdued and flatter.
I didn’t
add any grey to her skin and hair, that would look yucky ;-)
Mounted the
panel with foamtape.
Used
some black and silver stars washi tape on the cardbase.
I die
cut Memory box puffy clouds from the same watercolour paper and used a
different grey/blue to color them, white was too overpowering.
The
sentiment is from Good sayings by Pink Fresh Studio and I stamped it with
Versafine black onyx ink.
Job done
;-)
For more
information on the Simon Says Stamp Monday Challenge, see this
I work
on Schut Hotpressed and smooth 140lbs (300grams) watercolour paper.
I pulled
out an array of space like colors: chipped sapphire, faded jeans, twisted
citron, black soot, wilted violet picked raspberry. I had also pulled out
hickory smoke and blueprint sketch, but I didn’t use them.
From the
stains I used twisted citron, wilted violet, brushed pewter and picket fence
(Dylusions).
I taped
my panel on a small cutting mat, in case I need to move it around.
The
technique is quite simple: you wet a piece of the panel and drop in dots of color,
let the water carry it out and blend it. I start in the middle with the picked
raspberry.
I used a
palette with wells and then swatched the re inkers onto some watercolour paper,
as a blob of re-inker looks much the same as the one next to it.
Just to
indentify and remember wich is in wich well. You don’t have to do this. The
spray stains I put in little bowls, I don’t have many of the stains, but they
work well as watercolours if undiluted, they’re at their best undiluted, so you
get the true color, you could put them into water brushes and use them from the
water brush.
For the
outside I like to mix chipped sapphire and black soot, a true black space it
too stark in my opinion, also looks flat.
I bring
the black up to the edges of the pink and let the water wick it out.
If the
colours blend on their own they will look better, then when you try to mix with the brush, you also get
mud/brown quicker.
The
wilted violet and the faded jeans mix into a nice deep purple.
Dry
layers in between I used the heat gun and add more layers and details. Once
happy (ish) heat set it.
I
sprinkled with water, in some areas it didn’t lift any color, or barely, but
where it did, it adds dimension and depth, same with the brushed pewter and
picket fence splatter, the white is translucent and adds another layer and
depth. The splatters in front of the nebula and the “blobs” reaching into the
nebula contribute to a see through look, like it’s a proper gas cloud, see the
close ups , it really looks transparent, which of course can’t be, because it’s
on paper ;-)
Heat set
it again and then use fixative spray...
Decorate
with space like vessels and or alien die cuts if you like
It's ONE layer week over at Less is More and yesterday I found these gorgeous free digistamps over at http://sliekje.blogspot.nl/. I thought this little guy could be dreaming of being one of Santa's reindeer? So I had to try and print them on my thinner watercolor paper, It took a few tries as you can see as my laserprinter was making a long stripe I didn't want, not sure how it happened, it's like a dust trail I keep removing but as soon as I print it's back. Well it's and old laser printer, so...emptied all the black cartridge for this card too cos I tried to print on the back and it came out on the same side, upside down etc...haha. Anyway it worked in the end on a new piece of paper. I cut the A4 in half lengthwise to make two topfolding cards. The bat you see is from another free digi stamp source.
I used Distress inks to watercolor the little guy: rusty hinge, vintage photo, tattered rose, barn door, hickory smoke, mowed lawn. If I had thought about it, I could have made a custom sentiment and print it in one go, but instead I stamped this Hero arts (classic Christmas borders) with Versafine and the MISTI. For more information on the Less is More Challenge, see this
I wanted to stamp such a sentiment at first, but then I mounted the panel with foamtape before I got the chance and I didn't want to ruin my watercolored panel. The stamp is from Lili of the Valley and it's called snow family. I stamped it with My Favorite Things hybrid black ink and watercolored it with Distress inks: picked raspberry, lucky clover and peacock feathers. I think they are a good match to this week's CAS colours and sketches challenge. I used Schut 300grams aquarelpapier, coldpressed For more information on the CAS Colours and
The
Monday And Wednesday Challenges over at Simon Says Stamp are all about
Halloween.
In the
Netherlands it’s not big, or small even, I kinda like Halloween, but as such I don’t
have many supplies for this occasion.
So i
rummaged through my Simon Says Stamp supplies and thought I could adapt these
baby party animals.
I
stamped them with Tattered rose Distress inks on watercolour paper.
I tried
to mask off their bellies, but that wasn’t very successful, so instead I used a
bit of kitchen towel to wipe the belly off, most important on the mummy, the
rest could have stayed, in fact I restamped it in Versafine after coloring and
left the Dracula belly.
I drew
in details to make them Halloween dressed up baby animals.
Watercolored
them with Distress inks and after it dried I restamped it with Versafine to get
the details. I went over my pencil lines with the finest multiliner I have
0,05mm
Stamped
the sentiment from Lawn Fawn (monster mash) onto the card base.
Mounted
the panel onto the card base with foam tape.
For more
information on the Simon Says Stamp Monday challenge, see this
For more
information on the Simon Says Stamp Wednesday Challenge, see this


